Torna indietro   Hardware Upgrade Forum > Giochi > Console & Giochi per Console

KTC H27E6 a 300Hz e 1ms: come i rivali ma a metà prezzo
KTC lancia il nuovo monitor gaming H27E6, un modello da 27 pollici che promette prestazioni estreme grazie al pannello Fast IPS con risoluzione 2K QHD (2560x1440). Il monitor si posiziona come una scelta cruciale per gli appassionati di eSport e i professionisti creativi, combinando una frequenza di aggiornamento di 300Hz e un tempo di risposta di 1ms con un'eccezionale fedeltà cromatica
Cineca inaugura Pitagora, il supercomputer Lenovo per la ricerca sulla fusione nucleare
Realizzato da Lenovo e installato presso il Cineca di Casalecchio di Reno, Pitagora offre circa 44 PFlop/s di potenza di calcolo ed è dedicato alla simulazione della fisica del plasma e allo studio dei materiali avanzati per la fusione, integrandosi nell’ecosistema del Tecnopolo di Bologna come infrastruttura strategica finanziata da EUROfusion e gestita in collaborazione con ENEA
Mova Z60 Ultra Roller Complete: pulisce bene grazie anche all'IA
Rullo di lavaggio dei pavimenti abbinato a un potente motore da 28.000 Pa e a bracci esterni che si estendono: queste, e molte altre, le caratteristiche tecniche di Z60 Ultra Roller Complete, l'ultimo robot di Mova che pulisce secondo le nostre preferenze oppure lasciando far tutto alla ricca logica di intelligenza artificiale integrata
Tutti gli articoli Tutte le news

Vai al Forum
Rispondi
 
Strumenti
Old 15-09-2005, 00:48   #1
NaNu Gurthu
Member
 
Iscritto dal: Dec 2001
Messaggi: 22
gamecube usa-jap switch mi date informazioni sulla modifica?

sapreste darmi fonti internet su come si fa la modifica switch per passare il cubo da jap a usa e viceversa?
passo in questi giorni da console pal a una ntsc (più comoda per diversi motivi), e vorrei informarmi su questa possibilità.
grazie!!
cia
NaNu Gurthu è offline   Rispondi citando il messaggio o parte di esso
Old 16-09-2005, 02:01   #2
unlocked
Member
 
Iscritto dal: Mar 2004
Messaggi: 188
meglio modificare la pal e renderla universale..fine..
unlocked è offline   Rispondi citando il messaggio o parte di esso
Old 16-09-2005, 09:52   #3
NaNu Gurthu
Member
 
Iscritto dal: Dec 2001
Messaggi: 22
no,è che la ntsc mi serve per via dell'uscita S-video, che le PAL non hanno. inoltre non mi interessava propriamente renderla universale, quanto poter rendere facilmente (ed ECONOMICAMENTE...che le modifiche con chip non sono) una ntsc jap in USA, visto che dopo userei giochi usa.
aspetto risposte , grazie!
ciao
NaNu Gurthu è offline   Rispondi citando il messaggio o parte di esso
Old 16-09-2005, 10:23   #4
RedSky
Senior Member
 
L'Avatar di RedSky
 
Iscritto dal: Sep 2004
Città: SkyNet
Messaggi: 7850
Switch JAP to USA


Quote:
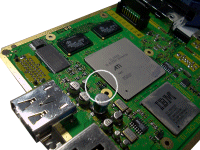
This is the main board, as seen from the video port side. Locate the ATI graphics chip, and the row of three jumpers as shown.


Quote:
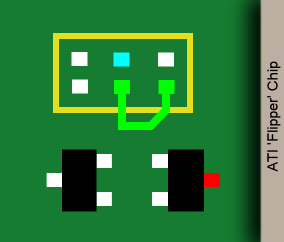
Here's a closeup of the jumpers you need to work with. These jumpers are very, very tiny, and this mod shouldn't be attempted by a soldering novice. There are three jumpers. Ignore the one on the left, and remove any jumpers on the center or right pair. Connect either of the two points joined by the green U-shaped trace to one leg of your switch, and the other to the blue or red point, depending on your GameCube model.

North American GC: use Red
Japanese GC: use Blue


Quote:
North American GC

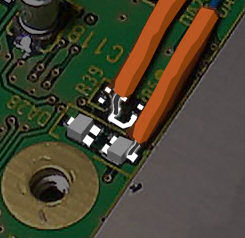
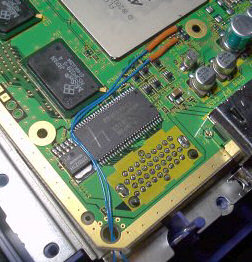
This pic shows the two wires connected to the appropriate points. To make the left wire easier to attach I scraped the green coating off the U-shaped trace. Use very thin wire (I used single-strand copper for this mod) and BE CAREFUL not to pull the wire after it's attached, you can peel the circuit off the board! Attach one wire to the U, and another to the transistor as shown.

Quote:
Japanese GC

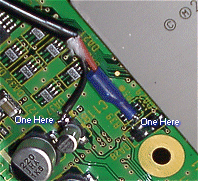
This pic shows the two wires connected to the appropriate points. To make the lower jumper pad more accessible, I scraped the PCB trace attached to it until the copper was revealed, and heaped some solder on it. Attach one wire to it, and another to the capacitor as shown.


Quote:
Here you can see how I routed the wire. There's a convenient hole in the corner nearest the jumpers, and you can see the wire coming out through another convenient hole in the side. From there, run it around the front and through yet another convenient hole underneath the connector for the control panel.

note! Be sure to leave lots of extra wire! It's easy to make it shorter later, but you can't make it longer if you guess the wrong length!


Quote:
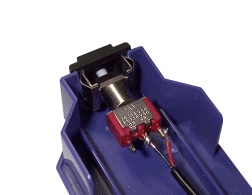
Using all the skill you can muster (And a dremel, if you've got one) cut or drill a hole for your switch in the end of this Serial Port cover. The advantage to putting it here should be obvious: you're not going to cause serious damage to the shell if you screw it up. Also, in the unlikely event Nintendo actually releases a modem or other device for this port, you can simply move the switch. I suppose that second point is a con, rather than a pro... Ah well.


Quote:

The Nintendo GameCube

Here it is - not the RGB mod we were hoping for but the next best thing - an import mod so we can all play the plethora of US released games on our Japanese cubes. Thanks to Planet GameCube for posting this. Don't forget the other GC stuff - the ring around the center of the disc, a review of the system itself over on AtariLabs, and the GameCube Guts page, which should come in handy when you're disassembling the unit.

Please discuss this page here.

This is the main board, as seen from the video port side. Locate the ATI graphics chip, and the row of three jumpers as shown.
Here's a closeup of the jumpers you need to work with. These jumpers are very, very tiny, and this mod shouldn't be attempted by a soldering novice. There are three jumpers. Ignore the one on the left, and remove any jumpers on the center or right pair. Connect either of the two points joined by the green U-shaped trace to one leg of your switch, and the other to the blue or red point, depending on your GameCube model.

North American GC: use Red
Japanese GC: use Blue

North American GC

This pic shows the two wires connected to the appropriate points. To make the left wire easier to attach I scraped the green coating off the U-shaped trace. Use very thin wire (I used single-strand copper for this mod) and BE CAREFUL not to pull the wire after it's attached, you can peel the circuit off the board! Attach one wire to the U, and another to the transistor as shown.

Japanese GC

This pic shows the two wires connected to the appropriate points. To make the lower jumper pad more accessible, I scraped the PCB trace attached to it until the copper was revealed, and heaped some solder on it. Attach one wire to it, and another to the capacitor as shown.
Here you can see how I routed the wire. There's a convenient hole in the corner nearest the jumpers, and you can see the wire coming out through another convenient hole in the side. From there, run it around the front and through yet another convenient hole underneath the connector for the control panel.

note! Be sure to leave lots of extra wire! It's easy to make it shorter later, but you can't make it longer if you guess the wrong length!
Using all the skill you can muster (And a dremel, if you've got one) cut or drill a hole for your switch in the end of this Serial Port cover. The advantage to putting it here should be obvious: you're not going to cause serious damage to the shell if you screw it up. Also, in the unlikely event Nintendo actually releases a modem or other device for this port, you can simply move the switch. I suppose that second point is a con, rather than a pro... Ah well.
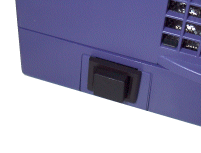
The finished product. Here's the switch in all its glory. Be sure to leave some extra wire length inside, in case you need to move the switch later, or want to open the unit up again.
questa fà per te

la sezione console abbonda di esperti in materia, sicuramente ti aiuteranno

ti lascio anche il link diretto del sito QUI
__________________
Consolelab on Youtube Scappato da WIND Fttc il 03/04: saturazione indecente per 7 mesi. Non aspettate mesi per andarvene. QUI e QUI le mie differenze documentate fra Wind FTTC Vula e TIM - Non fatevi abbagliare dai pochi € di risparmio di Wind - 🚀 TIM Fttc speedtest 200mbit @ TIM FTTH speedtest 🚀
RedSky è offline   Rispondi citando il messaggio o parte di esso
 Rispondi


KTC H27E6 a 300Hz e 1ms: come i rivali ma a metà prezzo KTC H27E6 a 300Hz e 1ms: come i rivali ma a met&...
Cineca inaugura Pitagora, il supercomputer Lenovo per la ricerca sulla fusione nucleare Cineca inaugura Pitagora, il supercomputer Lenov...
Mova Z60 Ultra Roller Complete: pulisce bene grazie anche all'IA Mova Z60 Ultra Roller Complete: pulisce bene gra...
Renault Twingo E-Tech Electric: che prezzo! Renault Twingo E-Tech Electric: che prezzo!
Il cuore digitale di F1 a Biggin Hill: l'infrastruttura Lenovo dietro la produzione media Il cuore digitale di F1 a Biggin Hill: l'infrast...
GeForce RTX 50 SUPER cancellate o rimand...
Windows 11 si prepara a vibrare: Microso...
La “Burnout Season” colpisce l’Italia: i...
QNAP annuncia il JBOD TL-R6020Sep-RP: ol...
Siemens e NVIDIA uniscono le forze: arri...
Ricarica veloce e durata batteria: miti ...
Le "navi volanti" di Candela a...
Bambini su misura? Il caso della startup...
Iliad porta le SIM Express in edicola: r...
Offerte Amazon sui TV Mini LED Hisense 2...
Il silenzio digitale che fa male: come i...
Il responsabile del programma Cybertruck...
Domanda alle stelle per SSD e RAM: in Gi...
Zuckerberg vuole eliminare tutte le mala...
Otto suicidi, un solo chatbot: si moltip...
Chromium
GPU-Z
OCCT
LibreOffice Portable
Opera One Portable
Opera One 106
CCleaner Portable
CCleaner Standard
Cpu-Z
Driver NVIDIA GeForce 546.65 WHQL
SmartFTP
Trillian
Google Chrome Portable
Google Chrome 120
VirtualBox
Tutti gli articoli Tutte le news Tutti i download

Strumenti

Regole
Non Puoi aprire nuove discussioni
Non Puoi rispondere ai messaggi
Non Puoi allegare file
Non Puoi modificare i tuoi messaggi

Il codice vB è On
Le Faccine sono On
Il codice [IMG] è On
Il codice HTML è Off
Vai al Forum


Tutti gli orari sono GMT +1. Ora sono le: 19:10.


Powered by vBulletin® Version 3.6.4
Copyright ©2000 - 2025, Jelsoft Enterprises Ltd.
Served by www3v