|
|||||||


|


|
|
 |
|
|
Strumenti |
 15-09-2005, 00:48
|
#1 |
|
Member
Iscritto dal: Dec 2001
Messaggi: 22
|
gamecube usa-jap switch mi date informazioni sulla modifica?
sapreste darmi fonti internet su come si fa la modifica switch per passare il cubo da jap a usa e viceversa?
passo in questi giorni da console pal a una ntsc (più comoda per diversi motivi), e vorrei informarmi su questa possibilità. grazie!! cia |

|

|
|
16-09-2005, 02:01
|
#2 |
|
Member
Iscritto dal: Mar 2004
Messaggi: 188
|
meglio modificare la pal e renderla universale..fine..
|
|
|
|
|
16-09-2005, 09:52
|
#3 |
|
Member
Iscritto dal: Dec 2001
Messaggi: 22
|
no,è che la ntsc mi serve per via dell'uscita S-video, che le PAL non hanno. inoltre non mi interessava propriamente renderla universale, quanto poter rendere facilmente (ed ECONOMICAMENTE...che le modifiche con chip non sono) una ntsc jap in USA, visto che dopo userei giochi usa.
aspetto risposte , grazie! ciao |
|
|
|
|
16-09-2005, 10:23
|
#4 | |||||||
|
Senior Member
Iscritto dal: Sep 2004
Città: SkyNet
Messaggi: 7850
|
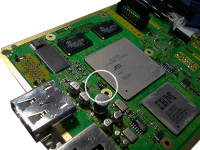
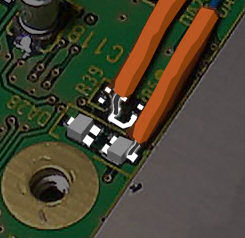
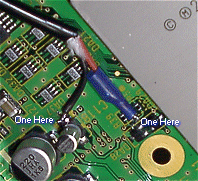
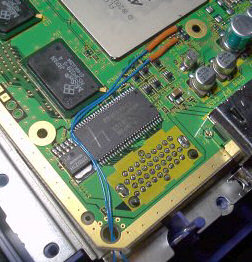
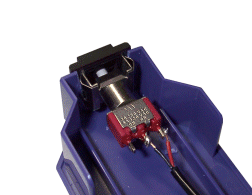
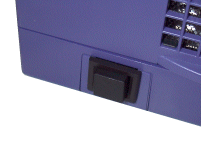
Switch JAP to USA
 Quote:
 Quote:
 Quote:
 Quote:
 Quote:
 Quote:
 Quote:
la sezione console abbonda di esperti in materia, sicuramente ti aiuteranno ti lascio anche il link diretto del sito QUI
__________________
Consolelab on Youtube Scappato da WIND Fttc il 03/04: saturazione indecente per 7 mesi. Non aspettate mesi per andarvene. QUI e QUI le mie differenze documentate fra Wind FTTC Vula e TIM - Non fatevi abbagliare dai pochi di risparmio di Wind - 🚀 TIM Fttc speedtest 200mbit @ TIM FTTH speedtest 🚀 |
|||||||
|
|
|
|
|
| Strumenti | |


|
|

Tutti gli orari sono GMT +1. Ora sono le: 22:35.