|
Senior Member
Iscritto dal: Nov 2005
Città: Припять
Messaggi: 4654
|
GUIDE
Il contenuto di questo post è rilasciato con licenza Creative Commons Attribution-Noncommercial-Share Alike 2.5
Battery drain in gaming e Comparativa Alimentatori Power Delivery 3:
by Giux-900
Quote:
|
Alimentatori Power Delivery 3.0 e Xiaomi Mi Notebook Pro i7
Capita di comprare un notebook discretamente potente e guardare con perplessità l’alimentatore fornito, compatto, piccolo, leggero. Ma sarà anche in grado di funzionare senza problemi?
Occorre prima di tutto definire cosa si intende per funzionamento, senza entrare nel merito del protocollo power delivery, ma spiegando per grandi linee cosa deve fare un alimentatore per essere considerato compatibile col dispositivo.
1- Deve essere in grado di ricaricare il notebook.
2- Deve essere in grado di fornire un voltaggio stabile.
3- Sotto sforzo si scalda ma non troppo.
4- Deve essere dimensionato come wattaggio al valore di picco.
Protezione Batteria e alimentazione ibrida
La protezione della batteria si ottiene facendo funzionare il pc sopra il 95% di carica collegato alla rete elettrica.
La batteria verrà esclusa dalla ricarica ed il pc sarà alimentato solo dal caricatore.
Questo perché la batteria si scarica da sola molto lentamente se il pc è alimentato dalla linea elettrica. In questo modo si evitano frequenti mini cicli di ricarica molto dannosi e si ricarica la batteria pochissime volte se connessi al caricatore.
Quando si scende sotto il 95% si ha un evento trigger riconosciuto in automatico dal chip EC, a questo punto inizia la ricarica fino al 100%. Una volta raggiunto il 100% il pc sarà nuovamente alimentato solo "ac line" dal caricatore.
Molti notebook usano questo sistema per preservare la batteria, con le dovute differenze, si può leggere un documento Dell dove è illustrato questo sistema, ovviamente Xiaomi può averlo implementato diversamente, ma la sostanza non cambia:
link
Nei giochi (full load) il notebook con i7 arriva a consumare 67W. Recentemente ho misurato l'efficienza del caricatore originale, non eroga i 65W necessari per un tempo sufficientemente lungo da coprire qualche ora di gioco. Ma al massimo 58-60W reali.
Questa mancanza di watt determina l'entrata in modalità di alimentazione ibrida "ac line" e "battery" contemporaneamente, per consentire al pc di ricevere energia a pieno regime.
Allora la batteria inizia lentamente a perdere qualche punto percentuale di ricarica (è normale anche un 5% in un’ora di gioco).
L'entrata in modalità ibrida è anche un evento trigger, questo significa che se sei "collegato, ma non in carica" al 98%, ed avvii un gioco, appena la batteria entra in alimentazione ibrida si innesca contemporaneamente la ricarica.
Questo spiega perché in uscita da un gioco (anche al 99%) in windows rileverai che la batteria entrata in caricamento.
Se si usa spesso il pc per giocare questo determinerà mini cicli di scarica e ricarica che portano ad un deterioramento precoce della batteria.
Per evitare l’entrata in modalità di alimentazione ibrida durante le sessioni di gioco è necessario avere a disposizione un alimentatore in grado di coprire anche il consumo di picco.
Test di 3 alimentatori Power Delivery USB Type-C:
Xiaomi originale 65W, Trusda PD-65W, Topvork PD-87W.
Metodologia di test:
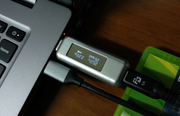
Per ciascun alimentatore ho testato tramite tester usb-c della Satechi i valori di voltaggio ed amperaggio per tre condizioni: Idle(non in carica), In carica (dal 40%), in gaming. Test eseguiti con cavo originale fornito xiaomi e cavo Tiegem 5A da 1m.
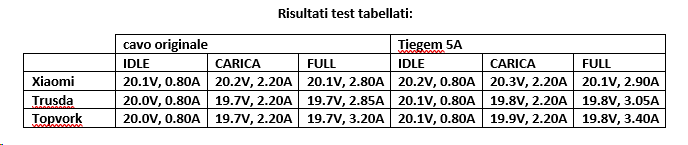
Risultati test tabellati:
Note:
- Durante le fasi di rilevamento si riscontra una normale variabilità nel voltaggio. Ho riportato il valore visualizzato con più frequenza per ciascun alimentatore.
- Gli amperaggi in full si riferiscono al valore di picco raggiunto.
- Xiaomi sia idle che gaming ha un voltaggio leggermente più alto e stabile, attorno a 20.1V.
- Il cavo originale ha un drop di circa 0.1V rispetto al cavo Tiegem.
- Solo il Topvork è in grado di assecondare il wattaggio di picco con punte tra 3.35A e 3.40A, che corrispondono a circa 67W. (valore in linea con quanto ampiamente verificato dai vari recensori online come notebook check).
- In full si ha battery drain ed entrata in alimentazione ibrida sia con alimentatore Xiaomi che con Trusda, a prescindere dal cavo.
- Nessun battery drain, neanche dopo qualche ora di gioco con alimentatore Topvork, che si dimostra la scelta migliore.
|
PATCH BIOS UNLOCK per Mi Notebook Pro (mx150 version only)
Quote:
Attenzione:
La seguente patch (by _Cyb_ ) va a scrivere informazioni sul bios andando ad abilitare SpeedShift Technology e Undervolt (voltage offset) che sono disattivate di default. Ci sono dei rischi di corrompere il bios e rendere il notebook inutilizzabile. Utilizzatela a vostro rischio e pericolo.
Download Patch
- Enabling Intel SpeedShift Technology (SST)
Shift + Right Click on the Patch folder and select Open PowerShell window here.
Execute the following script: .\script speedshift_unlock.cmd
- Enable CPU undervolting feature
Shift + Right Click on the Patch folder and select Open PowerShell window here.
Execute the following script: .\script voltage_unlock.cmd
(SST e undervolt offset) Testato e funzionante su BIOS XMAKB5R0P0603, XMAKB5R0P0906, XMAKB5R0P0A07
Alcune info e foto (by Rocco Capece):
Per quanto ne sappia l'SST dovrebbe gestire meglio la potenza richiesta dalla CPU, determinando una prontezza maggiore nel passare dall'idle a situazioni di maggior carico e viceversa. Su HWinfo si può verificare se l'SST è abilitato, mentre su throttlestop si può gestire il livello di SST applicato (1-255, dove un valore più piccolo corrisponde a maggiori consumi).
Per quanto riguarda l'uso di Throttlestop, l'ho preferito a iXTU perchè quest'ultimo mi aveva dato problemi nel mantenimento del profilo di voltaggio applicato.
Questi sono i passaggi che consiglierei di seguire, ma premetto che non me ne intendo me ne intendo molto, e sono aperto a consigli e a correzioni:
-Creazione profili prestazionali: sotto alimentazione, batteria e risparmio energetico (da usare con batteria bassa e in throttling) --> associare ogni profilo alle situazioni di utilizzo, in modo che il passaggio da un profilo all'altro sia automatico.
-Impostazioni profili: settare lo speedshift a diversi livelli in base al profilo (per esempio 16-64-128); eventualmente disabilitare il turbo nel profilo di risparmio energetico.
-Settaggio del voltage offset (undervolt) per ogni profilo (sezione FIVR): sul mio notebook (2017, versione i5-8250U) sono riuscito ad arrivare stabilmente a (-100mV) sia con la CPU che con la GPU intel; per quanto mi riguarda, ho impostato lo stesso livello di undervolt su tutti e tre i profili.
-Modifica di TDP e livelli boost (sezione TPL): io ho soltanto aumentato a 25W la potenza del power boost di lunga durata (da 28 secondi); si può sicuramente fare di più, ma a me non serviva farlo.
-Creazione di un'attività pianificata per aprire automaticamente il programma nell'area di notifica all'accesso
Vi allego gli screenshot della mia configurazione, così da farvi un'idea:
 
|
MOD Ventoline GTX sul Mi Notebook PRO - MOD GTX fan blades on Mi Notebook PRO version:
(Photo e mod by sonictrain)
Alternativa, Fix rattling fan, senza comprare ventole nuove:
Gli slot M.2:
Quote:
by Giux-900
I socket (basta contare i pin sul pcb) sono di tipo M ''keyed'' cioè hanno contatti mappati o registri compatibili con diverse tipologie di comunicazione su key type M e B+M. Ad esempio:
''keyed'' o piedinatura tipo B supporta: PCIe x2 / SATA /USB 2.0 / USB 3.0 / HSIC / SSIC / Audio / UIM / I2C
''keyed'' tipo M supporta: PCIe x4
I due slot/socket sono di tipo M (host side) sono indicati sul pcb della scheda madre come SSD.0 ed SSD.D3
SSD.0 è in configurazione socket 3, mette a disposizione fino a 4 linee pci-e.
SSD.D3 è in configurazione socket 2, è compatibile sata e mette a disposizione fino a 2 linee pci-e. (quindi probabilmente non ci sarà nessun aggiornamento bios per farlo andare a 4x)
Il socket può essere di tipo M misto o puro.
Il primo slot SSD.0 in configurazione socket 3 fa andare a 4x un ssd m.2 key M, ma non so dirti se è anche di tipo misto e quindi consente di installare anche m.2 sata B+M.
Il secondo slot SSD.D3 è di sicuro di tipo misto, ma essendo in configurazione socket 2 anche installando un ssd m.2 key M nvme, lo farà andare comunque al massimo 2x.
|
FIX INTERNAL_POWER_ERROR BSOD by sbronzo87
Quote:
Ho risolto completamente il probelma di "INTERNAL POWER ERROR"vche mi capitava.
Inizialmente avevo risolto ripassando dalla versione 1809 di Win10Home alla 1803, e così il sistema era stabile, finchè l'aggiornamento alla 1809 è arrivata e non riuscivo a bloccarla, così ho deciso di comprare una licenza di Win10Pro e bloccare gli aggiornamenti.
Formattando, però, ho voluto provare se con Win10Pro fosse possibile risolvere il problema installando nativamente la 1809.
Per puro caso, installando via via un driver alla volta, provavo ad aprire HWMonitor e fancendo un giro di sleep ho notato che il problema lo avevo con il driver NVMe di Samsung! Quindi son rimasto qualche settimana con l driver Microsoft.
Dopo aver aggiornato all'ultimo BIOS (ora mi sfugge il codice) ho riprovato ad installare i driver NVMe Samsung, e tutto fila liscio!
Quindi, ricapitolando, nel mio caso con
Win 10 Pro 1809
Ultimo BIOS
Installato tutti i driver Xiaomi
Aggiornato all'ultima versione i driver NVIDIA e gli eventuali INTEL con Intel Driver & Support Assistant
Installato i driver NVMe di Samsung
il PC non ha più problemi di INTERNAL POWER ERROR quando esce dalla modalità di sleep cn HWMonitor in esecuzione, né dopo aver caricato il pc oltre il 90% e risvegliandolo dallo sleep.
|
- Backup seriale di Windows 10 Home:
Quote:
Da windows ancora in cinese:
Da cmd come admin:
wmic path SoftwareLicensingService get OA3xOriginalProductKey
Se invece avete già formattato ed avete dimenticato di conservare il seriale sarà necessario andare a leggerlo nella uft del bios:
da linux:
sudo strings /sys/firmware/acpi/tables/MSDM
oppure usare il tool nirsoft firmwareTablesView:
https://www.nirsoft.net/utils/firmware_tables_view.html

E' possibile leggere il seriale anche tramite il noto software Aida64:
nella sezione scheda madre/acpi/MSDM (microsoft data management table)
|
- Conservare l'attivazione di Office per successive installazioni:
Quote:
by Giux-900
- Questa non sarà una guida dettagliata passo passo:
L'obbiettivo è collegare il seriale con l'account microsoft.
Al primo avvio di word2016 in cinese si avvierà tutta una procedura per l'attivazione.
La procedura mostrerà una finestra con 3 step:
- il primo con il seriale
- il secondo con un link che avvierà il browser per login
- il terzo per conferma attivazione.
Questa procedura fallirà allo step 2, in quanto il seriale regionale non sarà attivato al di fuori della regione Cina (funziona in tanti altri paesi tranne Italia). A questo punto ci sono due vie:
- Proseguire con l'assistenza Microsoft via browser, e nella chat con l'addetto Microsoft chiedere la cortesia di scambiare il seriale Cina con un seriale Ita.
- Oppure riavviare il sistema con la suite office non registrata, aprire word e nelle impostazioni account (in cinese, ma si capisce dove)
visualizzare il pulsante dove attivare la suite. A differenza del primo avvio, ora ci sarà una finestra con 3 sezioni, in alto a sinistra la trial 30gg, alto a destra link acquisto, in basso lo spazio per inserire il seriale. Ora per attivare con successo da questo punto in poi è necessario essere fisicamente in una nazione di appartenenza del seriale, oppure completare la procedura tramite un qualsiasi software vpn (esempio tunnelbear su India).
Come risultato vedrete nel vostro account MS tra i prodotti acquistati la suite "Office Home e Student 2016 for PC"
|
- Come installare Windows 10 ITA by Giux-900
Quote:
1) Estrazione Product Key
Si può recuperare il seriale originale dell'intallazione in Cinese. Alcune cose da tenere in considerazione:
La prima: Se avete attivato windows in cinese appena avviato il pc connessi ad internet verrà legata all'hardware una licenza digitale.
Quindi sarà possibile attivare windows senza inserire alcun seriale in fase di installazione.
Inoltre se avrete fatto l'accesso con account microsoft anche il pc con la copia di windows10 farà parte dei dispositivi in vostro possesso.
La seconda: il seriale è single language home. Non funziona su installazioni windows10pro.
Fare click sinistro sull'icona di Windows in basso a sinistra;
Digitare il comando “cmd“;
Nel prompt dei comandi copia/incollare questo comando e premere invio:
wmic path SoftwareLicensingService get OA3xOriginalProductKey
Segnarsi il product key mostrato dal sistema.
2) Creazione di una usb avviabile:
- Il modo piu' semplice è usare rufus:
https://rufus.ie/en_IE.html
- Scaricate la .iso da questa pagina usando Edge browser:
https://www.microsoft.com/it-it/soft...load/windows10
nota bene: la pagina vi farà scaricare la iso, senza il media creation tool.
Bisogna però andare sulle opzioni di Edge, strumenti di sviluppo, emulazione, stringa agente
utente "apple safari".
La pagina verrà ricaricata automaticamente mostrando il dowload della .iso ufficiale.
- scrivere la .iso in pendrive usb, semplicemente in GPT e fat32 usando rufus.
3) Boot usb:
- riavviare il pc con la usb inserita e premere f12.
non è necessario disattivare il secure boot.
update: usando la iso di windows1809 è necessario disattivare il secure boot, in quanto è obbligatorio ntfs per il pendrive.
(la iso contiene file singolo più grande superiore a 4GB).
link
Selezionare “Boot Order Device“;
Sulla destra tra le posizioni Windows Boot Manager e la chiavetta USB, posizionare quest'ultima che deve stare in prima posizione;
(ma se ben ricordo è possibile avviare direttamente, altrimenti salvare e riavviare.)
4) Partirà quindi la procedira di installazione di windows10.
step:
- "Installa"
- "Non ho codice product key"
- Accettare le condizioni di licenza
- Scegliere “Windows 10 Home” o altro windows a seconda se avete altri seriali oltre a quello recuperato con wmic.
- Cliccare su “Personalizzata: installa solo Windows (opzione avanzata)“
- Nello schema partizioni è possibile procedere in due modi: Il primo, formattare la partizione piu grande ed installare windows nella stessa.
Il secondo, eliminare tutte le partizioni, cliccare "nuovo" sullo spazio non allocato e lasciar ricreare le partizioni di sistema all'installer.
Dopodiché installare windows nella partizione piu' grande.
5) Completamento:
- A completamento installazione verificare nelle proprietà sistema la corretta attivazione di windows.
- Applicare aggiornamenti cumulativi manualmente, o avviare windows update.
- Installare i seguenti driver:
Lista drivers timi1701:
1- chipset 10.1.1.45
2- il management engine ME_SW_11.7.0.1068 da pacchetto gtx, che corrisponde all'ultima versione (agosto 2018).
3- SerialIO_30.100.1725.1_KabyLake_HF5_PV_RS3_v2
4- intel(r)_hideventfilterdriver_rs3 signed_v2.2.1.364
5- efd 1.23.5.1101
6- vga mx150 nvidia e uhd620 25.20.100.6323 intel ultimi drivers disponibili
7- card reader ultimo disponibile da pacchetto xiaomi mi pro
8- audio da pacchetto mi pro gtx che comprende Dolby (vedi link driver sopra)
9- wifi e bluetooth da windows update
10- Samsung_NVM_Express_Driver_3.0
6) Opzionale:
- usare l'oem configurator per rimettere il logo MI nella pagina di proprietà.
oppure editare a mano:
Computer\HKEY_LOCAL_MACHINE\SOFTWARE\Microsoft\Windows\CurrentVersion\OEMInformation
seguendo varie istruzioni disponibili su web.
|
- Cambiare pasta termica:
- Aggiornare BIOS
Quote:
Istruzioni aggiornamento per ULTIMO bios disponibile
XMAKB5R0P0A07
DOWNLOAD DA GITHUB SOLO VERSIONE MX150
https://github.com/daliansky/XiaoMi-...ee/master/BIOS
Aggiornare alla 0a07 solite precauzioni:
- scollegare tutte le periferiche usb
- cavo caricatore RIGOROSAMENTE CONNESSO e battera carica.
- Avviare eseguibile come amministratore.
- qualche attimo di pazienza e non interrompere per nessun motivo la procedura, il pc rimarrà spento per qualche secondo e si accenderà solo, non toccare nulla fino al caricamento di windows.
Graditi feedbacks da chi aggiornerà dalla 906 alla a07. 
|
Quote:
Instructions from Tech Tablet:
Step0 - Ensure Laptop is at 80% battery or more and that it is PLUGGED IN.
Step1 - Download Rufus (https://rufus.akeo.ie/) and format a usb to be “GPT Partitioning scheme for UEFI” and Filesystem set as “FAT32.” USB must be in the top USB port; usb boot does not work on the other.
Step2 – Copy files from extracted file (use winrar or 7zip to extract) then copy all files and make sure there is an EFI folder at the root of the drive. Shutdown laptop.
Step3 – Switch on and keep pressing F2 to enter BIOS. Once there, disable secure boot and clear keys, then go an enable USB boot. You need to set a supervisior password first (keep it handy for future reference). Look at other guides on how to use the BIOS. Press F10 to save changes and restart. Shutdown PC.
Step4 – Switch on and keep pressing F12 to enter boot selection menu. You will find the usb there. The UEFI shell should load until you see a fs: .
Step5 – Type unlockme in the to unlock bios. This is will boot into windows but there is a high chance you wont be able to login. Shut down the PC.
Step6 – Repeat Step4 and then type flash to begin flashing. This will reboot and start flashing. BE PATIENT and let it finish. It will boot into windows finally.
Step7 – Fingerprint might not work, you will need to type in your password to log in.
Step8 – Use same instructions as Step3 and enable secure boot and other settings you may want. Press F10 to save and reboot.
Step9(optional) – Login to PC and then right click start menu and then settings. Go to Accounts then sign in options. Remove fingerprint and then add it back again. Ensure that you have ENOUGH POWER on the laptop as flashing disables charging momentarily.
|
------------------------------------------------------------------------------- SEZIONE GUIDE TRADOTTE DA 4PDA :
- Sbloccare voltage offset in Intel XTU (by _Cyb_ ):
per bios 502 e 603 ( solo versione pro, non testato su GTX)
Patch per sbloccare voltaggio, modifica valore attivazione ventole e attivazione Intel SST (speedshift technology): (by _Cyb_ )
SOLO PER BIOS 603( solo versione pro, non testato su GTX) Questa patch è stata testata (con successo) solo da pochi utenti su 4pda, se qualcosa va storto avrete il bios corrotto e il notebook brickato. Recuperabile solo con programmatore hardware tipo ch341a + soic8 clip. SEGUITE LE ISTRUZIONI A VOSTRO RISCHIO E PERICOLO
Quote:
http://4pda.ru/forum/index.php?showt...#entry76102206
[Instructions for installing custom EC firmware (coolers patch)]
Your BIOS version should be XMAKB5R0P0603! Upgrade before next steps.
The default version to flash is +12°, if you need version +20°, replace ec604.bin with the corresponding one from the EC folder
0) Make a full dump of your BIOS firmware: backup.cmd, save file mybackup.bin outside of laptop
1) Remove write protection BIOS: bios_unlock.cmd, be sure to reboot
2) Save your EC: readEC.cmd, the ec.bin file will appear, this is your EC backup
3) Flash new EC: flashEC.cmd, will be flashed ec604.bin
4) First pull out the power cable, then completely turn off the laptop (Start->Shutdown, not just close the lid), wait a minute, insert the cable, wait 5 seconds, turn on the laptop
5) Put back write protection for BIOS: bios_lock.cmd
[Possible errors and how to fix them]
1) The firmware dump utility reports:
Error 318: The host CPU does not have read access to the target flash area. To enable read access for this operation you must modify the descriptor settings to give host access to this region.
FPT Operation Failed.
Solution:
- it is necessary at least once to start BIOS update procedure, until the "unlockme" step inclusive, after that the procedure can be interrupted
2) Problems with security policies and the inability to run PowerShell scripts, for example:
"The .\Patchscript_bue.ps1 file does not have a digital signature. The script can not be run bla bla bla"
Solutions:
- enter the following from the command line: powershell set-executionpolicy remotesigned
- in more advanced cases, in group security policies, you must enable scripting for powershell
- if nothing helped, then my knowledge is over, look for the solution here: https://docs.microsoft.com/en-us/pow....security/set- execution_policy?view=powershell-6
3) Coolers after the patch are still kicked at 42°
- Repeat step number 4, sometimes you need to juggle the cable several times (almost always more than one)
- If it does not help, check that the firmware update was successful: run again readEC.cmd, compare new ec.bin and ec604.bin, now they should be binary same
- If the firmware update was successful, but all manipulations with the power cable was unsuccessful, then it remains only to throw off the battery cable for a couple of minutes, or just wait, sooner or later the EC will read new firmware, after one of the reboots or after a night's sleep
4) The laptop after patch did not turn on, the power indicator is always orange
- this means that you did something completely wrong, and now only one way: backup "mybackup.bin" flash by an external programmer (for example ch341a + soic8 clip, or at any service on laptops)
[How to roll back]
1. Flash the original BIOS
2. Flash only the EC from backup ec.bin, by the instructions above, also the original file can be found in the archive (EC\Orig\ec603.bin)
[Additionally]
I found a way to enable Intel SpeedShift. This is a new technology to control the frequency of the processor.
Read more about this technology here: https://www.anandtech.com/show/9751/...ive-processors
You can enable it using the script speedshift_unlock.cmd
|
Troubleshooting Ubuntu 18.10 by snk26
Quote:
Troubleshooting Ubuntu 18.10 by snk26
I did not install Ubutnu 18.10 from scratch, but was updated from 18.04. Perhaps some of the problems flew due to incorrect updates. I’ll say right away that I installed it for the sake of a fingerprint, I set everything up and even works, so I am satisfied with the result.
1. Set up a fingerprint scanner
After installing the package, the user appears "Entry by fingerprint". The interface for adding fingerprints is of course buggy, I pressed the “Next” button to navigate through the menu items.
The fingerprint must be added as follows - smoothly swiping your finger over the scanner for 2 seconds, preferably grabbing most of the finger cushion. In my mode, it works at 90%.
- Thank you so much for the help and silent participation of Igor Filatov. He finalized libfprint for our scanner and sent a patch to the developer, which should be included in the new version of libfprint 0.8.3.
https://github.com/iafilatov/libfprint
I will attach the library I collected from the source code https: //gitlab.freedes...rg/libfprint/libfprint and really hope for the appearance of libfprint 0.8.3 in Ubuntu 18.10. Then the last line will not need to be executed. Just ask to check and inform what packages are needed for installation, because After the experiments, I could skip the required package.
Installation
sudo apt install fprintd fingerprint-gui policykit-1-fingerprint-gui libbsapi
gunzip libfprint.so.0.0.0.gz && sudo cp -y libfprint.so.0.0.0 / usr / lib / x86_64-linux-gnu /
2. Gesture management
Why are they and how it works.
Swipe. Put 3 fingers on the touch and all three fingers at the same time quickly hold up - this is a svayp up and, accordingly, similar to the svaypy down, left and right. A really convenient thing, for example, in the browser, the right swipe returns to the previous page, and the left swipe opens the next page in the history (if there is one). Svayp up switches to the upper workspace, and svayp down to the bottom.
# There is also a pinch in / out type of increase / decrease, but it is impossible to use them on our tache (although this gesture works without problems on a Mac on their tache)
See for comparison how it works on Mac
https://lifehacker.ru/...mac-trackpad-gestures/
There are also additionally custom gestures, which can be read about from the developer https://github.com/bulletmark/libinput-gestures
I turned off as unnecessary pinch in / out, but turned on the increase. Decrease the volume with a gesture like rotating the volume knob in the /etc/libinput-gestures.conf config
gesture pinch clockwise xdotool key --clearmodifiers XF86AudioRaiseVolume
gesture pinch anticlockwise xdotool key --clearmodifiers XF86AudioLowerVolume
Installation
sudo gpasswd -a $ USER input
sudo apt install xdotool wmctrl libinput-tools
git clone https://github.com/bulletmark/libinput-gestures.git
cd libinput-gestures
sudo make install (or sudo ./libinput-gestures-setup install)
libinput-gestures-setup autostart
libinput-gestures-setup start
3. We solve the problem with the brakes
The problem with the drivers on the video card that need to be updated.
# Installation
apt-add-repository ppa: graphics-drivers / ppa
apt install nvidia-driver-410
4. We solve the problem with sound
After installation, I lost the sound. The problem is solved by installing timidity.
# Installation
apt purge timidity timidity-daemon
5. Problem with apt
In the console, apt swears and the problem as I see it in localization.
2018/10/27 11: 06: 39.884075 main.go: 158: argument "abort" 's "<change ID> s" should not be wrapped in <> s
Solutions is to run apt c LANG = C
LANG = C sudo apt autoremove
either hard-code the apt and apt-get files as done here
6. Installing Nvidia Optimus via Bumblebee by theZest
We use Nvidia Optimus technology through Bumblebee on distributions that are based on Ubuntu 18.04
A couple of reservations to start:
1. Yes, you can stupidly install the Nvidia driver and use the acceleration by default, but it is strong and in most cases senselessly loads the laptop, since the whole graphics starts to be drawn with a discrete video card, the whole is ALL: desktop, terminal, file manager and so on. Why is this at all? And the battery eats much more actively than the built-in graphics of Intel, and causes unpleasant consequences such as reducing fonts in KDE - completely inconvenience.
2. Using nano is quite simple: CTRL + O - save (press Enter), CTRL + X - exit. No need to know anything else.
3. Everything was checked for elementary OS 5.0 Juno, for ubunt and minta should also be appropriate. But ideally the bumblebee works in Manjaro! There you don’t need to do anything of the following, just install the distribution itself.
• To begin, we will add a repository with drivers and update the system:
sudo apt install software-properties-common && sudo add-apt-repository ppa: graphics-drivers / ppa && sudo apt update && sudo apt upgrade
• (Optional) Remove the nouveau open source driver:
sudo apt remove xserver-xorg-video-nouveau
• Install the nvidia driver and the bumblebee itself:
sudo apt install bumblebee-nvidia primus nvidia-driver-415 nvidia-dkms-415
• Disable nvidia’s nasty services:
sudo sh -c "systemctl disable nvidia-fallback && systemctl disable nvidia-persistenced && systemctl disable gpu-manager"
• Add the Nvidia driver and other insidious modules to the "sanctions list" so that they do not load when the system starts:
echo -e 'blacklist nouveau \ nblacklist nvidia \ nblacklist nvidia-drm \ nblacklist nvidia-modeset \ nalias nouveau off \ nalias nvidia-drm off \ nalias nvidia-modeset off' | sudo tee -a /etc/modprobe.d/nvidia-bl.conf
• Rule the bumblebee config for our needs:
sudo nano /etc/bumblebee/bumblebee.conf
Below are the parts where you need to make changes:
...
...
# The Driver used by Bumblebee server. If this value is not set (or empty),
# auto-detection is performed. The available drivers are nvidia and nouveau
# (See also the driver-specific sections below)
Driver = nvidia
...
## Section with driver driver options nvidia, only parsed if Driver = nvidia
[driver-nvidia]
# Module name to load, defaults to Driver if empty or unset
KernelDriver = nvidia
PMMethod = auto
# colon-separated path to the nvidia libraries
LibraryPath = / usr / lib / x86_64-linux-gnu: / usr / lib / i386-linux-gnu
# comma-separated path of the directory containing nvidia_drv.so and the
# default Xorg modules path
XorgModulePath = / usr / lib / x86_64-linux-gnu / nvidia / xorg, / usr / lib / xorg / modules, / usr / lib / xorg / modules / input
XorgConfFile = / etc / bumblebee / xorg.conf.nvidia
...
• Rule the primus script, because Nvidia’s last firewood broke it:
sudo nano / usr / bin / primusrun
# "Accelerating" libGL
export PRIMUS_libGLa = $ {PRIMUS_libGLa: - '/ usr / $ LIB / libGL.so.1'}
# "Displaying" libGL
export PRIMUS_libGLd = $ {PRIMUS_libGLd: - '/ usr / $ LIB / libGL.so.1'}
• Set one useful variable:
echo -e '__GLVND_DISALLOW_PATCHING = 1' | sudo tee -a / etc / environment
• We remove nvidia-prime traces of its activities:
sudo sh -c "prime-select intel && apt remove nvidia-prime && rm /lib/modprobe.d/blacklist-nvidia.conf"
• Final touches: we bring the bootloader parameters to mind:
sudo nano / etc / default / grub
There are 2 parameters that need to be added (just in case):
GRUB_CMDLINE_LINUX_DEFAULT = "quiet splash modprobe.blacklist = nouveau nogpumanager "
• We give meaning to what we have just done:
sudo update-grub
Since I’ve deleted the nouveau in my office, you’ll see if you need the first parameter.
• Reboot:
systemctl reboot
Well, check the on-off (switching!) Of our MX150:
cat / proc / acpi / bbswitch; primusrun glxinfo | grep vendor; cat / proc / acpi / bbswitch; sleep 5; cat / proc / acpi / bbswitch
If this happens, then everything is in order:
0000: 01: 00.0 OFF
server glx vendor string: NVIDIA Corporation
client glx vendor string: primus
OpenGL vendor string: NVIDIA Corporation
0000: 01: 00.0 ON
0000: 01: 00.0 OFF
Now you can run everything that requires serious graphic efforts, with commands like primusrun% command% or optirun% command%
PS: For those who have Secure Boot enabled (during installation or after, manually):
Most likely, when performing one of the first points, namely, when installing nvidia-dkms-415, you will have a password request window so that later on the nvidia modules are signed with the key and loaded on demand. We must agree! There is nothing complicated: enter a temporary password of 9 characters (stupidly 123456789), confirm when you restart we get into the utility menu that adds your personal generated key to sign the modules to the “white list” for Secure Boot, act the same as when you installed the OS . If something went wrong and the nvidia module still doesn’t load, try reinstalling nvidia-dkms-415. There are several methods to solve this problem, I personally preferred the second one.
But best of all, it's stupid not to update the driver anymore, that is, after installation, simply disable the third-party repository with driver 415, but since There is no such version of the driver in standard turnips, then there should be no problems with possible updates.
Post has been by theZest -
|
Audio su Linux: by Mixanic1997
Quote:
al posto del Dolby si può usare il ladspa-bs2b plugin
https://wiki.archlinux.org/index.php...ples_(Italiano)
Via pacmd list-sinks | grep -e 'name:' we look at the name of the audio output, I have it alsa_output.pci-0000_00_1f.3.analog-stereo and then execute:
pacmd load-module-module-ladspa-sink sink_name = binaural master = alsa_output.pci-0000_00_1f.3.analog-stereo plugin = bs2b label = bs2b control = 700,4.5
where Sink_Name is any arbitrary name, and "master" is the name of the audio output.
After the last command, another audio output will appear in the sound settings, with the signature LADSPA Plugin, which you will need to select.
pulse config:
default-sample-format = float32le
default-sample-rate = 48000
alternate-sample-rate = 44100
default-sample-channels = 2
default-channel-map = front-left, front-right
default-fragments = 2
default-fragment-size-msec = 125
resample-method = soxr-vhq
enable-lfe-remixing = no
high priority = yes
nice-level = -11
realtime-scheduling = yes
realtime priority = 9
rlimit-rtprio = 9
daemonize = no
|
work in progress...
Ultima modifica di Giux-900 : 17-07-2020 alle 03:59.
|